If in the previous chapter has been discussed what tools are needed to create a pattern, in this chapter will be discussed about the process of making it. Technically, pattern creation is done in two ways, namely:
1. Flat Pattern Drafting Technique
The flat pattern drafting technique is a method of drawing patterns on a flat medium, such as on paper for example. In the depiction of the pattern with this method, the pattern maker should be able to imagine the final result of the seam when the pattern has been moved on the fabric and finished sewn.
2. Blocks or Draping Pattern Techniques
Blocks or draping patterns are more suitable for professional pattern makers, because this technique is more difficult than flat pattern drafting techniques. In blocks or draping patterns, the pattern maker taps the belacu cloth over the sewing doll or directly on the body of the prospective wearer.
The fabric is pinned with a reflective needle so as not to shift its position. On the sleeves, neck circumference, and waist, the fabric is clipped according to the desired pattern. Pieces of this pattern fabric when finished traced to the original fabric, it can be sewn as a prototype of clothing.
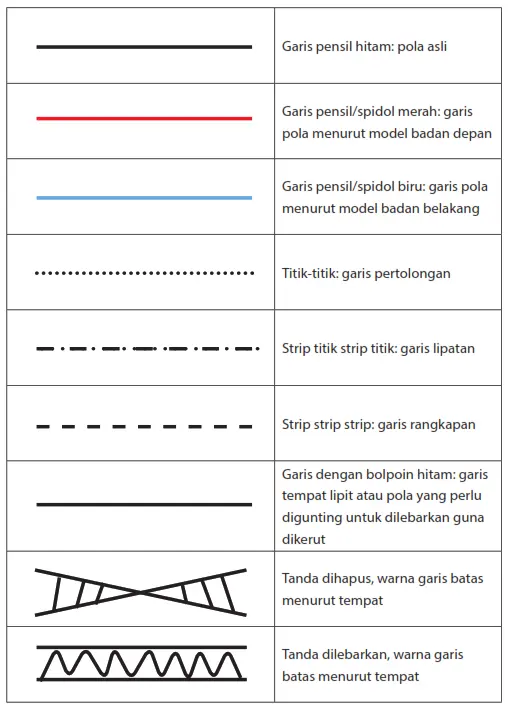
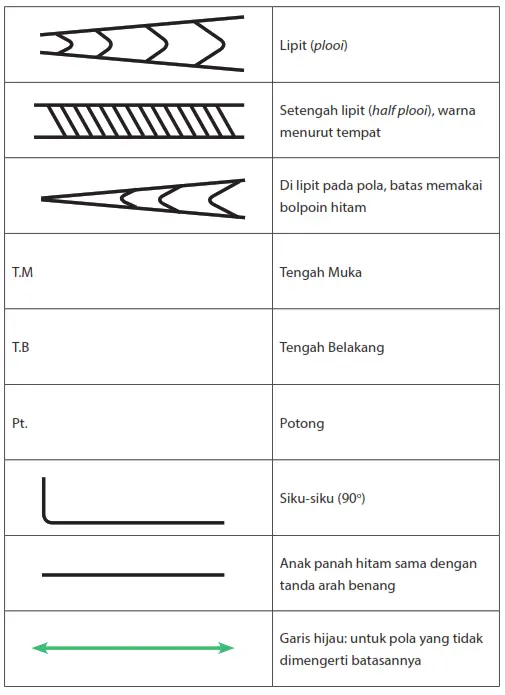
In pattern creation, we should also get to know some of the signs used to draw patterns and change models. Some of these signs can be learned in the following table:
Once we get the body size that the clothes will make, the next step is to write that size into the pattern book. In addition to writing down the size, we also describe the pattern on a smaller scale, usually 1:4, 1:6, or 1:8.
The pattern book becomes the next guide to drawing patterns of real size. For the depiction of patterns on the body, we can use the ‘half’ method, which is the pattern drawn half the body for each part of the front body as well as the back body.
A pattern of actual size, drawn on copy paper. It is this pattern that will be traced to the fabric. Patterns drawn from copy paper can also be used repeatedly. That’s why it’s good for patterns to be kept as archives when at any time we’re going to sew the same size.
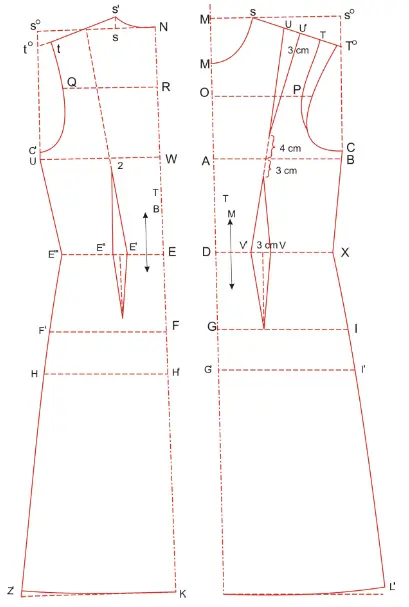
To facilitate depiction, the size of the pattern is distinguished into three groups, namely the size of the width, the size of the length, and the size of the circumference. Once the depiction is complete, the pattern is cut into shapes. For women’s dress archety patterns, skirt archety patterns, and sleeve arches, we can see in the following image :
• Archety template of women’s dresses (in scale 1: 4)
|
Size |
Small |
Medium |
Large |
|
Body Circumference |
84 + 4 = 88 |
88 + 4 = 92 |
92 + 4 = 96 |
|
Waist circumference |
66 |
68 |
72 |
|
Chest length |
32 |
33 |
34 |
|
Chest width |
32 |
32 |
33 |
|
Back length |
37 |
38 |
39 |
|
Back width |
34 |
34 |
35 |
|
Pelvic circumference I |
84 + 4 = 88 |
90 + 4 = 94 |
94 + 4 = 98 |
|
Pelvic circumference II |
88 + 4 = 92 |
94 + 4 = 98 |
98 + 4 = 102 |
|
Shoulder width |
12 |
12 ½ |
13 |
|
Skirt length |
60 |
65 |
70 |
Front Pattern
- M’S = 65 cm
- M’M = 7 cm
- M’So = ¼ body circumference = 1 cm = 23 cm
- MO = 5 cm
- OP = ½ chest width = 16 cm
- MA = ½ chest length
- MD = chest length = 32 cm
- AB = M’S = ¼ body circumference = 1 cm
- BC naik 1 cm DG = 13 cm DG’ = 20 cm
- DJ = panjang rok = 60 cm
- So To = 5 cm
- S and To have to be connected
- ST = shoulder width = 12 cm
- SU = ½ shoulder width – 1 cm = 5 cm
- UU’ = 3 cm
- DV’ = 1/10 waist circumference = 6,6 cm
- VV’ = 3 cm
- DX = ¼ waist circumference + 13 (lipit pantas) = 20 ½ cm
- GI = ¼ Pelvic circumference I + 1 cm = 23 cm
- G’ I’ = ¼ Pelvic circumference II + 1 cm = 24 cm
- JL = G’I’ + 5 cm
- LL’ = 1 cm
Rear Pattern
- NR = 10 cm
- NE = back length = 37 cm EW = DA = ½ chest length = 16 cm NS = M’S = 6,5 cm
- SS’ = 2 cm
- NSo = ¼ body circumference – 1 cm = 21 cm
- WU = NS = ¼ lingkar badan – 1 cm
- So to = 3 cm
- S’ connected to the S’t = lebar bahu = 12 cm UC = naik 1 cm
- RQ = ½ back width = 17 cm
- EF = 13 cm
- EH = 20 cm
- EK = long skirt = 60 cm
- EE’ = 1/10 waist circumference = 6,6 cm, EE’ = 2 cm
- EE”’ = ¼ waist circumference – I + 2 (lipit pantas) = 17 ½ cm
- FF’ = ¼ waist circumference I – 1 cm = 21 cm
- HH’ = ¼ waist circumference II – 1 cm = 22 cm
- KZ = HH’ + 5 cm
- ZZ naik 1 cm
If it is small, it is smaller than 88 cm (body circumference)
MS = 6 cm
MM = 6,5 cm
If what will be made is a blouse pattern, then it is only made to the pelvic boundary only.
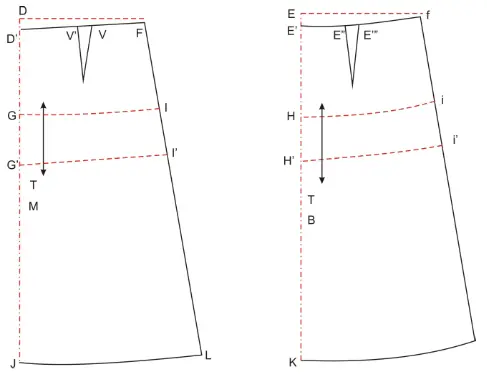
Here are the basic sewing patterns:
- Base pattern of the skirt (in a scale of 1: 4 cm)
Front pattern:
- D – F = ¼ waist circumference + 2 cm
- D – D’ = 1 cm D’ – G = 13 cm D’ – G’ = 20 cm
- D’ = J = long skirt
- G – I = ¼ hip circumference I
- G’ – I’= ¼ hip circumference II J – L = G’ = I’ + 5 cm
- D’ – V= 2/ /3 x D – F V ke kiri 2 cm = V’
- drawing pleated fit (coupe)
- F – L = D’ – I
Back pattern:
- E – F = ¼ waist circumference + 2 cm
- E – E’= 2 cm
- E’ – H = 13 cm
- E’ – H’ = 20 cm
- E’ – K= long skirt
- H – i = ¼ hip circumference I
- H’ – i’= ¼ hip circumference II K – I = H’ – i’ + 5 cm
- E’ – E = 1/10 waist circumference
- E” ke kanan 2 cm = E’” drawing pleated fit (coupe)F – l = E – K
Basic Skirt Pattern Shapes
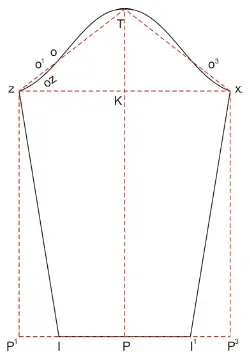
• Basic female arm pattern
|
Size |
Small |
Medium |
Large |
|
Sleeve length |
54 cm |
55 cm |
56 cm |
|
Wrist circumference |
22 cm |
24 cm |
26 cm |
|
Chest height |
12 cm |
12 ½ cm |
13 cm |
Ukuran kecil:
- K – T = Chest height = 12 cm
- T – p = Sleeve length = 54 cm
- Drag the flat line from K to the left and to the right
- From T line to Z along the face arm = 22 cm
- And from T to X along the back arm = 20 cm
- Poiinting O = ½ Z – T = 11 cm
- OI – O2 = 1 cm (drop down)
- X – O3 = ½ X – T minus 1 cm = 9 cm
- From point Z and X made perpendicular lines down are P’ and P” Then P’ – P” measured then reduced wrist circumference = 34 cm
- 22 cm = 12 cm
- Half of this residual is measured from PI to right and from P” to left
- To be P’ – I = 6 cm dan P” – I’ = 6 cm
Here’s the basic pattern:
3. Moving Patterns on Fabrics
When the pattern is finished drawing and cropped, the next step is to move the pattern onto the fabric. The process of transferring the pattern to the top of the fabric is called the tracing method.
Before tracing the pattern onto the fabric, we need to look at the condition of the fabric, whether the fabric is tangled or already smooth. If the fabric that we want to use as a condition material is still tangled, it would be nice if we iron it first before tracing the pattern on top of the shrouded cloth. Tracing the pattern on the crumpled fabric will affect the lines of the.
The steps of tracing the pattern onto the fabric are as follows:
Tracing steps
1. Prepare equipment for tracing, i.e. sewing lime, carbon, and rader.
2. Because the pattern is deliberately made to the size of half of each piece, then at the time of tracing this, the fabric is folded into two parts.
3. If the fabric used is a patterned fabric, pay attention to the channel motif, especially for striped motif fabric. Do not let the channel for the front body differ from the back.
4. Place the pattern directly on top of the fabric that has been folded into two parts.
5. To prevent the position from shifting, it is permissable to pin the reflector needle to combine patterns and fabrics. Or it could also be by indicating the load on top of piles of patterns and fabrics.
6. When the position is felt appropriate, the tracing process begins. Trace the pattern by using sewing chalk.
7. To trace the kupnat part, it can be done by using carbon sewing and rader. But carbon and rader testing can only be done in the bad parts of the fabric. That’s also for a thick cloth.
8. When the pattern has been traced in a circular manner, the next step is to cut the pattern onto the fabric is as follows
For the process of slipping fabric the principle is almost the same as when we trace the pattern. In essence, the fabric should not shift. For this reason, when it comes to cutting fabric, it is necessary to pin the reflecting needle or pierce the heavy load on the cloth. It was only then that the milling process was done. Use really sharp, un blunt scissors. Cutting the fabric with blunt scissors will make the edges of the fabric messy or fibrous.
Tips For Sharpening Blunt Scissors
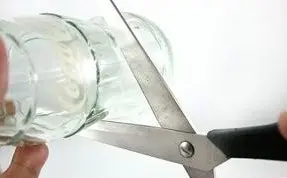
Appropriately, when the scissors we’ve been wearing for a long time will be blunt. These blunt scissors often make us feel irritated because they make the cut not smooth/ mbrudul. But don’t worry, as there are tips for sharpening back blunt scissors. The equipment that needs to be prepared is a glass bottle.
Take the glass bottle, hold it with your left hand on the body of the bottle. Use your right hand to hold the blunt scissors. Open the scissors and position to flank the neck of the bottle. Perform gestures such as cutting over and over again. Friction between the scissors and the glass bottle will make the scissors return sharp.


